Tuesday, March 30, 2010

Talking to Jenny Rudd about Moodle and online teaching and learning

I had the great pleasure of talking to Jenny Rudd last week about her experiences of developing Moodle for online teaching and learning. Jenny is program coordinator for the National Certificate of Mental Health Support (NCMHS) and Senior Lecturer in Mental Health in the School of Social Services.

Here are a few questions I asked Jenny.

How do you use Moodle at the moment?
The NCMHS is a full time course and students are expected to come onto campus one day a week for face-to-face teaching. I have always had to be creative with how I deliver content in the face-to-face classroom and give students a lot of 'take-way' resources. So at the moment I am using Moodle as a repository for information and resources. But in the future I am hoping to develop online learning packages.

What do you feel are the challenges to online learning and the use of Moodle?
At the moment I use my one day a week of face-to-face contact for activities such as role play, which are designed to help students engage, explore and integrate content. Now I am thinking about how to replicate the high energy that we have in the classroom into the online environment. I have found the Graduate Certificate of Tertiary Learning and Teaching a great support for learning how to design flexible, online teaching activities and resources - I have a vision and plan, and the GCTLT gave me the theory and learning to back up my plans.

I am very excited about the wonderful resources that are already online so one challenge is to work out how I can integrate them into my teaching. It does take time to research and find what I want but I love doing it, and I think it is well worth taking the time to find quality resources - it is valid work and needs to be recognised as such.

What tips do you have for teachers who are designing courses in Moodle?
I think it is really important to take time to think about how you want to set things up. If you have a course that has been migrated over from Moodle, you can feel horrified when you see the mess. I start from scratch with empty, white space and start from there.
  1. Organise content into topics, not weeks - this gives you more flexibility.
  2. Presentation is really important so use lots of visuals
  3. Keep the design of the course clean and uncluttered
  4. Allow plenty of time for students to have a 'play' in a computer laboratory at the beginning of the course, so they overcome their anxiety about something that is new - remember how you felt when you first started to use a computer
  5. Don't overwhelm students with technology - take the time to introduce activities and resources gradually.
What feedback have you had from students?
The feedback I have received about Moodle from students has been very positive so far. They find it very simple compared to BlackBoard - much easier than having to follow lots of clicks and folders. I haven't had to do any follow-up tutorials for students like I have in the past.


A big 'thank you' to Jenny for these tho0ughts and tips. If you'd like to leave a comment or question for Jenny, please feel free to do so in the comment section here.

Tuesday, March 23, 2010

How to make an audio recording with Audacity

In last week's digital skills workshop Bronwyn showed us how to use Audacity to record and edit a piece of audio - here are written instructions on how to use Audacity for those of you who missed the session.


In this Friday's (26th March) workshop, we'll be looking at some of the things you can do with audio such as add it to PowerPoint or make a slidecast in Slideshare.

Sunday, March 21, 2010

What is Internet Archive?

A fabulous place for finding all sorts of resources for teaching and learning is Internet Archive. It is a non-profit library of websites and artefacts that have been digitalised. All the materials are free to access, and most are free to share and re-distribute - it is worth checking the licence to a resource to check exactly how you can re-use it.

Internet Archive stores materials such as podcasts, videos, music and books. You can find web pages that no longer exist in 'The Wayback Machine'. There is even an archive of live music concerts.

My favourite section of Internet Archive is 'Moving Images'. I have found some wonderful education films that were made in the 50s and 60s that make a great foundation for class discussion, such as these two films about sex education that were made in the 1950s.

I also use Internet Archive to store my own digital materials. For example, I store evidence of achievements which I then link to my ePortfolio.

The only caveat to this is to be prepared to spend a lot of time browsing around this web site - it is addictive!


Do you have any favourite web site that you use for accessing teaching and learning resources?

Thursday, March 18, 2010

How to use Animoto to make a quick and free videos

Animoto is an excellent online program that allows you to make quick and easy videos made out of pictures or photos - here is a video I made out of pictures I found on Flickr. You don't have to download any software, and it is free to make a 30 second video. These short videos are great for introducing a subject to students, giving them some visuals to start them thinking about a topic, or using as part of a more formal presentation. Because Animoto is so easy to use, it is also a great tool for students to use for project work. I love it for making personal videos made out of family photos such as this one I made for my daughter's 21st birthday.

Once you have made the video, you can post it onto YouTube or embed it into your blog, or share the link to the video on Facebook or Twitter.

If you want to be able to make longer videos, you have to pay for the 'pro' version. It isn't very expensive so you may feel it is worth paying so your department has access to the account. The other advantage of the 'pro' account is that you can download your video as an mp4 file - with the free account, you can only access the video on the Internet. However, as an educator, you can apply to have a free educator's account with all the advantages of the 'pro' account without having to pay for it.

Here is a video that shows you how to make an Animoto video.


http://www.youtube.com/watch?v=48194ShehLI&feature=PlayList&p=DFC79C73F7978F30&playnext=1&playnext_from=PL&index=2


Please leave us details of videos you make with Animoto - we'd love to see them.

Editing audio


This Friday's (March 19th) digital skills workshop is dealing with how you edit audio so you can then attach it to presentations and videos.

Time: 13.00 hours
Venue: H208A Otago Polytechnic

Feel free to bring along any audio track that you'd like to edit.


Image: Microphone visual.dichotomy
http://www.flickr.com/photos/visual_dichotomy/3623619145/

Finding free music to add to presentations, videos and so on

When you add music to presentations or videos, you must be very careful that you are not breaking copyright - you are probably breaking copyright if you use music from your personal collection of CDs.

One of the places I recommend to find free music for download is Jamendo. This is a website where musicians leave their music for others to download and share under Creative Commons licence. You can find music in most genres - jazz, classical, easy listening, electronic, dance, hip-hop.

Have a look at this post by Richard Byrne for more information, and other places to look for free music and sound effects.

Is there any web site you'd recommend to find free music for presentations etc?

Wednesday, March 17, 2010

How to use Jing to take a picture of your computer screen

Jing is a free software that you can download onto your computer which allows you to take pictures of your computer screen. This is really useful if you want to show students how to do something on the computer, like access a resource on Moodle. I like Jing because it allows you to add arrows and text to an image, to make it clear exactly what you are trying to point out or say - I have used Jing to illustrate my instructions in this post.

The first 4/5 minutes or so of this video will show you how to download Jing onto your computer.


http://www.youtube.com/watch?v=b_1d_OretsA

Here is a video I have made to show you how to use Jing once you have downloaded it onto your computer.


http://www.youtube.com/watch?v=s08yIBv2zWI


Can you recommend any other tools to do similar work?

Tuesday, March 9, 2010

How to take a picture of your computer screen

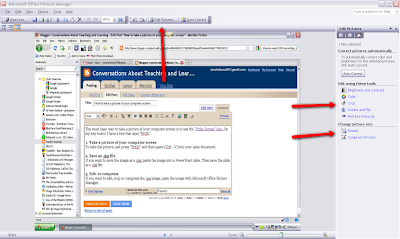
The most basic way to take a picture of your computer screen is to use the "Print Screen" key. On my key board I have a key that says "PrtSc".

1. Take a picture of your computer scree
To take the picture, just press "PrtSc" and then paste (Ctrl - V) into your open document.

2. Save as .jpg file
If you want to save the image as a .jpg file, paste the image into a PowerPoint slide. Then save the slide as a .jpg file.


3. Edit, crop or compress
If you want to edit, crop or compress the .jpg image, open the image with Microsoft Office Picture Manger. Click on crop, resize or compress- which ever action you wish to take.

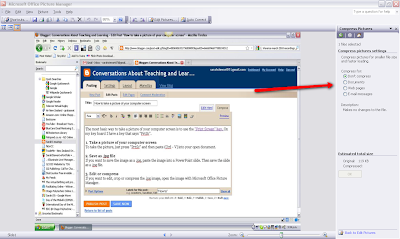
4. Compressing an image
If you wish to make the image suitable to put into Moodle, a wiki or blog and you are not sure what size to make it, use the "compress" facility. This will automatically make your image the suitable size for a document, web page or email - which ever you specify.


Do you have any tips for taking screen shots?


Wednesday, March 3, 2010

Making your own images

Friday's (Friday 5th March 2010) digital skills workshop at Otago Polytechnic is about how to make your own images, focusing on how to make screenshots. In particular, we'll be looking at free tools such as Jing, which you can use to take and manipulate pictures of your computer screen. This comes in very handy when you are trying to give students instructions about how to use computer program.

The workshop will run from 13.00-15.00 hours in H208A. We're also happy to have a look at anything else you're interested in, so come along with ideas.


Image: 'Grapefruit Splash' John Steven Fernandez
http://www.flickr.com/photos/11419506@N08/2272752165

Monday, March 1, 2010

How to make a word cloud with Wordle

Wordle is a website that allows you to turn words into a picture, otherwise known as a word cloud. You can also use Wordle to find themes from a report or document.

To do this, go to the Wordle website - go to 'create' and paste in the text you want to turn into an image.

Here is a Wordle image that was made from a blog post I wrote: "Virtual birthing unit goes international".